
Here we show how to set up a MongoDB cluster. In the previous post we showed how to install it on one machine.
There are three pieces to install:
- config server
- query router
- shard server, i.e., database
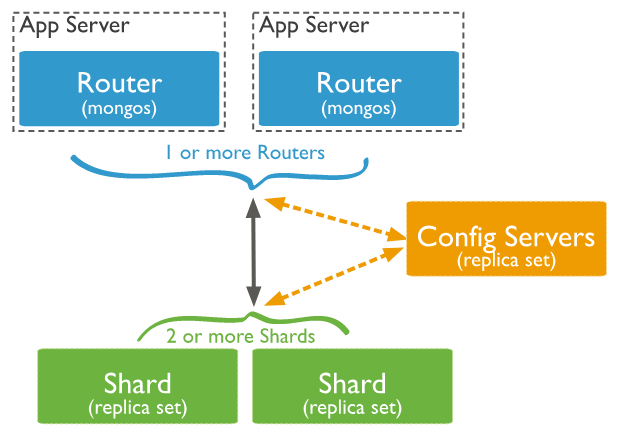
Looking at the diagram below, the mongos process runs as a router, meaning it tells clients where to look for data. Data is spread across the cluster based on sharing. Sharding is the assignment of records to servers based on the hashed value of some index. The config server hold configuration information.
(This article is part of our MongoDB Guide. Use the right-hand menu to navigate.)
Install MongoDB
Technically, to make a MongoDB a cluster just means to three layers of the MongoDB architecture as separate processes. You could do this for academic purposes on one machine. But here we use two.
We will install the router and config servers on 172.31.46.15 and the shard server on 172.31.47.43. For simplicity, let’s call the first server the config server and the second server the database server.
Do not use apt-get to install MongoDB as that is not the current version, usually. Instead follow the steps below. Note that this installs mongod (config and shard server), mongos (router), and mongo client as three separate packages.
Open firewall ports 27017, 27018, and 27019 between the two servers.
You need the all three packages on the config server but only mongodb-org-server on the database server. On Ubuntu, install them like this.
wget https://repo.mongodb.org/apt/ubuntu/dists/xenial/mongodb-org/4.0/multiverse/binary-amd64/mongodb-org-server_4.0.5_amd64.deb
sudo dpkg -i mongodb-org-server_4.0.5_amd64.deb
wget https://repo.mongodb.org/apt/ubuntu/dists/xenial/mongodb-org/4.0/multiverse/binary-amd64/mongodb-org-shell_4.0.5_amd64.deb
sudo dpkg -i mongodb-org-shell_4.0.5_amd64.deb
wget https://repo.mongodb.org/apt/ubuntu/dists/xenial/mongodb-org/4.0/multiverse/binary-amd64/mongodb-org-mongos_4.0.5_amd64.deb
sudo dpkg -i mongodb-org-mongos_4.0.5_amd64.deb
Note that if you mess up any step, remove the server and then erase the data file library, /var/lib/mongodb. If you don’t erase the data files when you reinstall the software it will keep the previous configuration and thus restore any mistakes you made.
Config server
Login to the config server.
To set up all three servers we will repeat the same 4 steps on each server:
- Edit config file
- Start process
- Check log for errors
- Log into shell to do further configuration
Now, on the config server edit the config file. Note for the sake of simplicity we make each config file have a descriptive name:
sudo vim /etc/mongodConfig.conf
Paste in the text below. First, we explain some of the fields:
path: /var/log/mongodb/mongodConfig.log | For each process we give the log a name that makes clear which process it is for. |
port: 27019 bindIp: 172.31.46.15 | By default the config server will run on port 2019 in a clustered configuration. We make that explicit here so it not necessary to remember that. Also the IP address is a non-loopback address.That is so that other servers can find this server. |
sharding: clusterRole: configsvr | Sharding means to distribute data according to some hashing scheme. Here we tell MongoDB that this server is a config server, as opposed to a sharing server. |
replication: replSetName: ConfigReplSet | This means to replicate this configuration data. We use rs.() functions to add other replicas. We can use any name. |
Paste this text into /etc/mongodConfig.conf:
storage:
dbPath: /var/lib/mongodb
journal:
enabled: true
systemLog:
destination: file
logAppend: true
path: /var/log/mongodb/mongodConfig.log
net:
port: 27019
bindIp: 172.31.46.15
sharding:
clusterRole: configsvr
replication:
replSetName: ConfigReplSet
Start the process:
sudo mongod --config /etc/mongodConfig.conf&
Check the logs for errors:
sudo tail -100 /var/log/mongodb/mongodConfig.log
Log in to the shell:
mongo 172.31.46.15:27019
Turn on replication with rs.initiate() and check the status with rs.status(). Notice that is picked up the name of the replication set we configured in the config file, ConfigReplSet.
> rs.initiate()
{
"info2" : "no configuration specified. Using a default configuration for the set",
"me" : "172.31.46.15:27019",
"ok" : 1,
"operationTime" : Timestamp(1548598138, 1),
"$gleStats" : {
"lastOpTime" : Timestamp(1548598138, 1),
"electionId" : ObjectId("000000000000000000000000")
},
"lastCommittedOpTime" : Timestamp(0, 0),
"$clusterTime" : {
"clusterTime" : Timestamp(1548598138, 1),
"signature" : {
"hash" : BinData(0,"AAAAAAAAAAAAAAAAAAAAAAAAAAA="),
"keyId" : NumberLong(0)
}
}
}
ConfigReplSet:SECONDARY> rs.status()
{
"set" : "ConfigReplSet",
Configure Query Router
Login to the config server.
Edit the config file:
sudo vim /etc/mongoRouter.conf
Paste in the text below. Notice:
configDB: ConfigReplSet/172.31.46.15:27019 | This tells the query router where to find the config server and their replica sets. |
systemLog:
destination: file
logAppend: true
path: /var/log/mongodb/mongoRouter.log
net:
port: 27017
bindIp: 172.31.46.15
sharding:
configDB: ConfigReplSet/172.31.46.15:27019
Start the service. Notice the s in mongos. This is the query router process.
sudo mongos --config /etc/mongoRouter.conf&
Check the log and look for errors:
mongo 172.31.46.15:27017
Configure Shard
Log into database server.
sudo vim /etc/mongodShard.conf
Paste in the text below. Notice that:
clusterRole: shardsvr | Means this will be a shard server, as opposed to a config server. |
replSetName: ShardReplSet | This means to replicate the data. In the config server we told it to replicate the configuration. |
port: 27018 | By default shard servers run on port 27018. So we make that explicit so we don’t have to remember that. |
storage:
dbPath: /var/lib/mongodb
journal:
enabled: true
systemLog:
destination: file
logAppend: true
path: /var/log/mongodb/mongodShard.log
net:
port: 27018
bindIp: 172.31.47.43
sharding:
clusterRole: shardsvr
replication:
replSetName: ShardReplSet
Start the process.
sudo mongod --config /etc/mongodShard.conf&
Check the log for errors.
sudo tail -f /var/log/mongodb/mongodShard.log
Log into the shell.
mongo 172.31.47.43:2018
Turn on replications with rs.initiate() and then check the status with rs.status(). Notice the name ShardReplSet. We could use any name as long as we use the same name across all shards in the cluster.
rs.initiate()
{
"info2" : "no configuration specified. Using a default configuration for the set",
"me" : "172.31.47.43:27018",
"ok" : 1,
"operationTime" : Timestamp(1548602253, 1),
"$clusterTime" : {
"clusterTime" : Timestamp(1548602253, 1),
"signature" : {
"hash" : BinData(0,"AAAAAAAAAAAAAAAAAAAAAAAAAAA="),
"keyId" : NumberLong(0)
}
}
}
ShardReplSet:SECONDARY> rs.status()
{
"set" : "ShardReplSet",
Add Shard to Cluster
Go back to config server and connect to router:
mongo 172.31.46.15:27017
Paste all of the followings commands into the shell:
sh.addShard( "ShardReplSet/172.31.47.43:27018")
{
"shardAdded" : "ShardReplSet",
"ok" : 1,
"operationTime" : Timestamp(1548602529, 4),
"$clusterTime" : {
"clusterTime" : Timestamp(1548602529, 4),
"signature" : {
"hash" : BinData(0,"AAAAAAAAAAAAAAAAAAAAAAAAAAA="),
"keyId" : NumberLong(0)
}
}
}
Create a database named books then enable sharding.
use books
switched to db books
sh.enableSharding("books")
{
"ok" : 1,
"operationTime" : Timestamp(1548602601, 6),
"$clusterTime" : {
"clusterTime" : Timestamp(1548602601, 6),
"signature" : {
"hash" : BinData(0,"AAAAAAAAAAAAAAAAAAAAAAAAAAA="),
"keyId" : NumberLong(0)
}
}
}
Create a collection.
db.createCollection("collection")
{
"ok" : 1,
"operationTime" : Timestamp(1548602659, 5),
"$clusterTime" : {
"clusterTime" : Timestamp(1548602659, 5),
"signature" : {
"hash" : BinData(0,"AAAAAAAAAAAAAAAAAAAAAAAAAAA="),
"keyId" : NumberLong(0)
}
}
}
Create an index. We will index the field isbn in descending order.
db.collection.createIndex( { isbn: -1 } )
{
"raw" : {
"ShardReplSet/172.31.47.43:27018" : {
"createdCollectionAutomatically" : false,
"numIndexesBefore" : 1,
"numIndexesAfter" : 2,
"ok" : 1
}
},
"ok" : 1,
"operationTime" : Timestamp(1548602670, 9),
"$clusterTime" : {
"clusterTime" : Timestamp(1548602670, 9),
"signature" : {
"hash" : BinData(0,"AAAAAAAAAAAAAAAAAAAAAAAAAAA="),
"keyId" : NumberLong(0)
}
}
}
Add one record.
db.collection.insertOne( { isbn: 100 } )
{
"acknowledged" : true,
"insertedId" : ObjectId("5c4dcd69e83741cb900b46f8")
}
Turn on sharding for the collection.
sh.shardCollection("books.collection", { isbn : "hashed" } )
{
"collectionsharded" : "books.collection",
"collectionUUID" : UUID("0d10320b-3086-472e-a3ac-4be67fae21f9"),
"ok" : 1,
"operationTime" : Timestamp(1548603537, 12),
"$clusterTime" : {
"clusterTime" : Timestamp(1548603537, 12),
"signature" : {
"hash" : BinData(0,"AAAAAAAAAAAAAAAAAAAAAAAAAAA="),
"keyId" : NumberLong(0)
}
}
}
Now verify that data is distributed across cluster as shown below. Of course we only have one database server, so it just shows one. In another blog post we will show how to add more servers.
db.collection.getShardDistribution()
Shard ShardReplSet at ShardReplSet/172.31.47.43:27018
data : 0B docs : 0 chunks : 2
estimated data per chunk : 0B
estimated docs per chunk : 0
Totals
data : 0B docs : 0 chunks : 2
Shard ShardReplSet contains NaN% data, NaN% docs in cluster, avg obj size on shard : NaNGiB
These postings are my own and do not necessarily represent BMC's position, strategies, or opinion.
See an error or have a suggestion? Please let us know by emailing blogs@bmc.com.