An effective continuous integration (CI) and continuous delivery (CD) pipeline is essential for modern DevOps teams to cope with the rapidly evolving technology landscape. Combined with agile concepts, a fine CI/CD pipeline can streamline the software development life cycle resulting in higher-quality software with faster delivery.
In this article, I will discuss:
- What to know before building a CI/CD pipeline
- Jenkins CI/CD pipeline example
- Steps for setting up a Jenkins pipeline
- Azure CI/CD pipeline example
- And more!
(This article is part of our DevOps Guide. Use the right-hand menu to go deeper into individual practices and concepts.)
What to know before building your CI/CD pipeline
What is a CI/CD pipeline?
The primary goal of a CI/CD pipeline is to automate the software development lifecycle (SDLC).
The pipeline will cover many aspects of a software development process, from writing the code and running tests to delivery and deployment. Simply stated, a CI/CD pipeline integrates automation and continuous monitoring into the development lifecycle. This kind of pipeline, which encompasses all the stages of the software development life cycle and connects each stage, is collectively called a CI/CD pipeline.
It will reduce manual tasks for the development team which in turn reduces the number of human errors while delivering fast results. All these contribute towards the increased productivity of the delivery team.
(Learn more about stages in a CI/CD pipeline, deployment pipelines and the role of CI/CD.)
What is Jenkins?
Jenkins is an open source server for continuous integration and continuous deployment (CI/CD) which automates the build, test, and deploy phases of software development. With numerous plugins you can easily integrate, along with choices of tools, programming languages, and cloud environments, Jenkins is highly flexible and makes it easier to efficiently develop reliable apps.
Why use Jenkins for CI/CD
You might wonder why Jenkins is a good option for building your CI/CD pipeline. Here are some of the reasons it is popular:
- Extensive plugin support: Whatever you want to do, there is likely already a plugin for it, which speeds and simplifies your work.
- Active open source community: Being free of licensing costs is just the beginning. It is supported by an active community, contributing solutions, advice, ideas, and tutorials.
- Platform independent: You are not tied to a specific operating system.
- Scalable: You can add nodes as needed and even run builds on different machines with different operating systems.
- Integratable: Whatever tools you are using, you can likely use them with Jenkins.
- Time-tested: Jenkins was one of the first CI/CD tools, so it is tried and true.
Jenkins CI/CD pipeline example
What does a CI/CD pipeline built using Jenkins look like in action? Here is a simple web application development process.
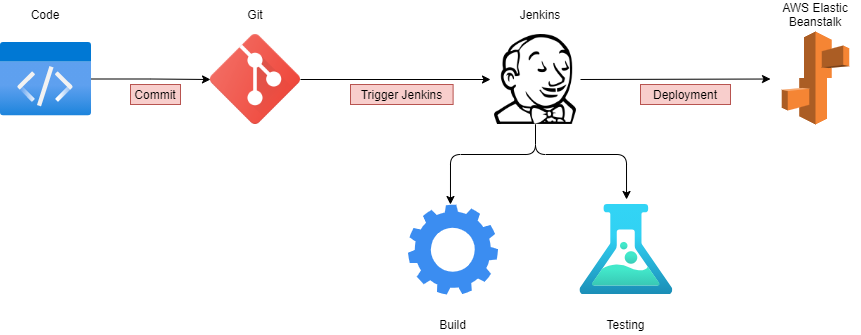
Traditional CI/CD pipeline
- The developer writes the code and commits the changes to a centralized code repository.
- When the repo detects a change, it triggers the Jenkins server.
- Jenkins gets the new code and carries out the automated build and testing. If any issues are detected while building or testing, Jenkins automatically informs the development team via a pre-configured method, like email or Slack.
- The final package is uploaded to AWS Elastic Beanstalk, an application orchestration service, for production deployment.
- Elastic Beanstalk manages the provisioning of infrastructure, load balancing, and scaling of the required resource type, such as EC2, RDS, or others.
The tools, processes, and complexity of a CI/CD pipeline vary from this example. Much depends on your development requirements and the business needs of your organization. Typical options include a straightforward, four-stage pipeline and a multi-stage concurrent pipeline — including multiple builds, different test stages (smoke test, regression test, user acceptance testing), and a multi-channel deployment (web, mobile).
8 steps to build a CI/CD pipeline using Jenkins
In this section, I’ll show how to configure a simple CI/CD pipeline using Jenkins.
Before you start, make sure Jenkins is properly configured with the required dependencies. You’ll also want a basic understanding of Jenkins concepts. In this example, Jenkins is configured in a Windows environment.
Step 1: Install Jenkins
Download Jenkins from the official website and install it. Install Jenkins using the following Docker command:
docker run -d -p 8080:8080 jenkins/jenkins:lts
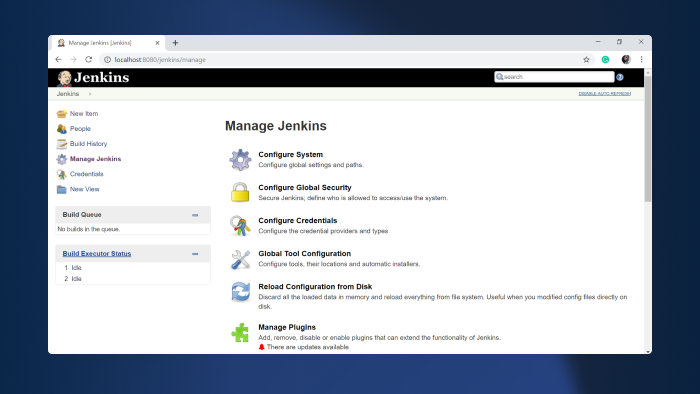
Step 2: Configure Jenkins and add necessary plugins
Configuring Jenkins is a matter of choosing the plugins you need. Git and Pipeline are commonly used tools you might want to add from the start.
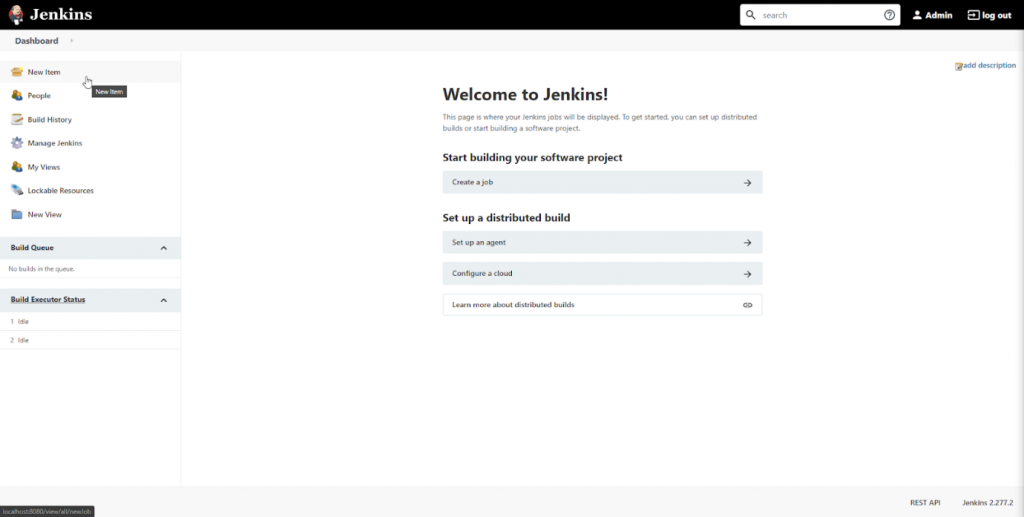
Step 3: Open Jenkins
Login to Jenkins and click on “New Item.”
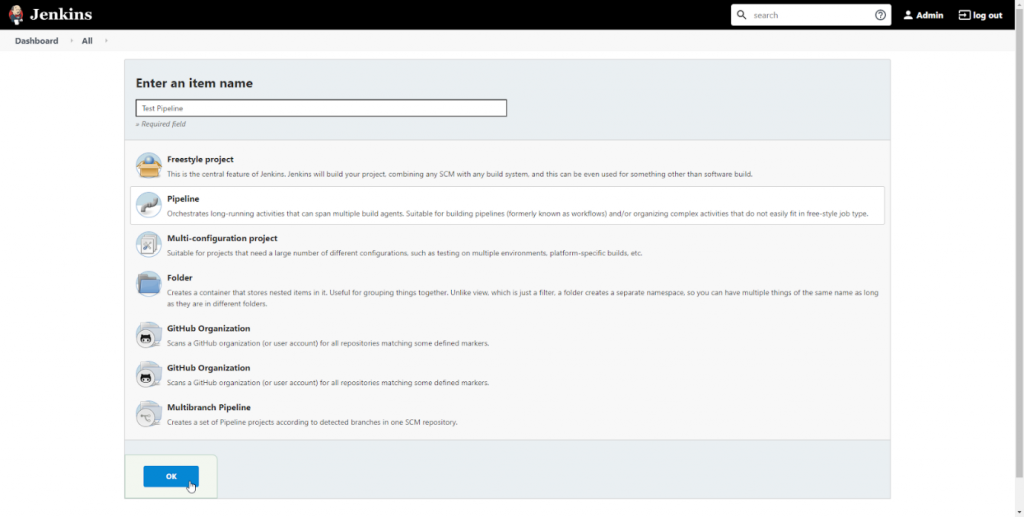
Step 4: Name the pipeline
Select the “Pipeline” option from the menu, provide a name for the pipeline, and click “OK.”
Step 5: Configure the pipeline
We can configure the CI/CD pipeline in the pipeline configuration screen. There, we can set build triggers and other options for the pipeline. The most important section is the “Pipeline Definition” section, where you can define the stages of the pipeline. Pipeline supports both declarative and scripted syntaxes.
(Refer to the official Jenkins documentation for more detail.)
Let’s use the sample “Hello World” pipeline script:
pipeline {
    agent any
    stages {
        stage('Hello') {
            steps {
                echo 'Hello World'
            }
        }
    }
}
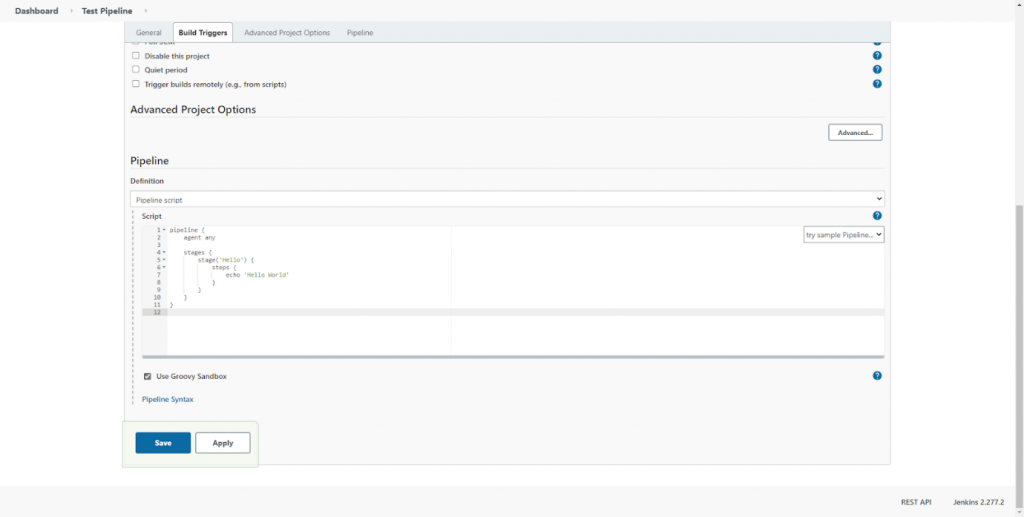
Click on Apply and Save. You have configured a simple pipeline!
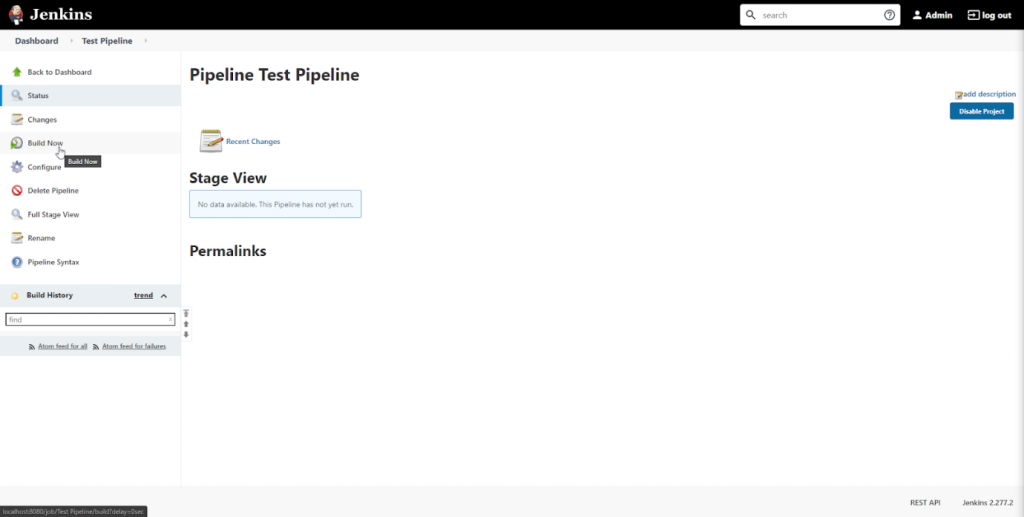
Step 6: Execute the pipeline
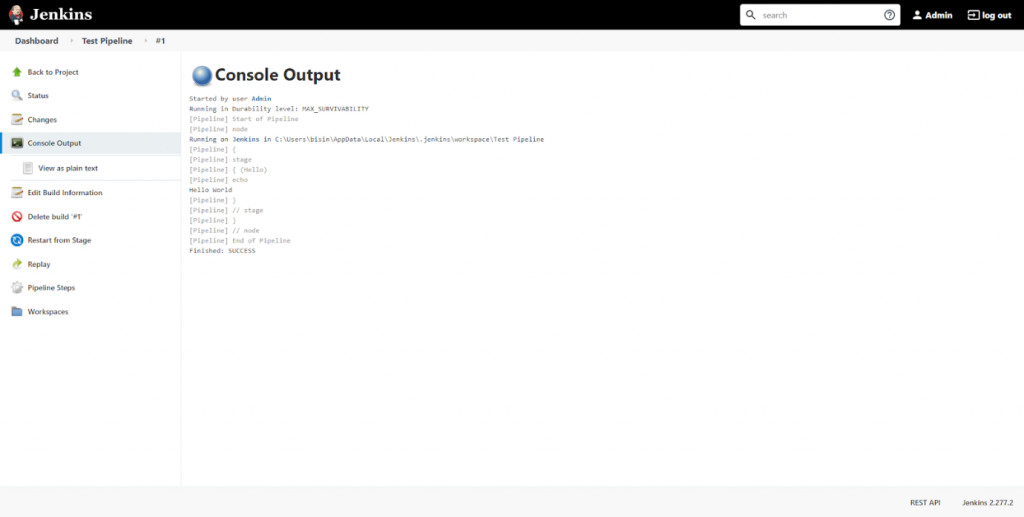
Click on “Build Now” to execute the pipeline.
This will result in the pipeline stages getting executed and the result getting displayed in the “Stage View” section. We’ve only configured a single pipeline stage, as indicated here:
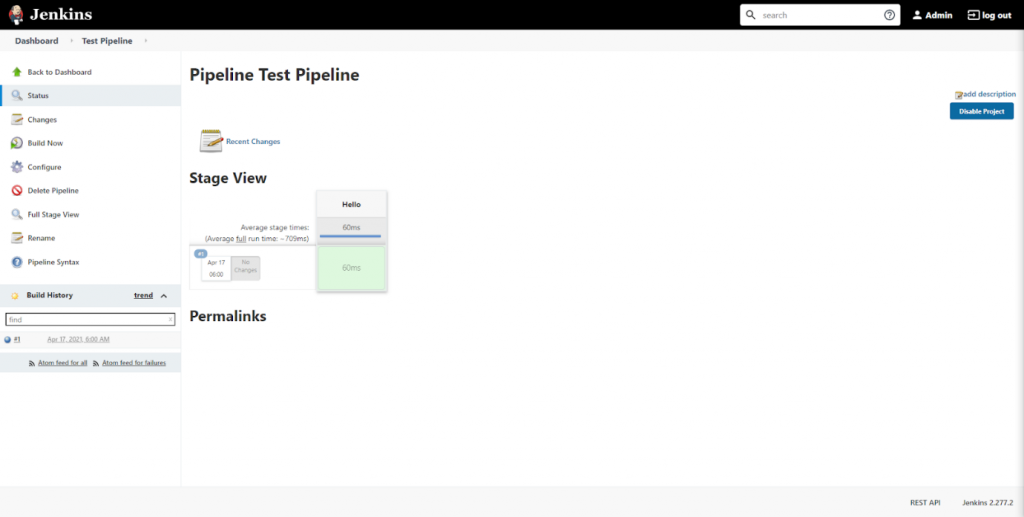
We can verify that the pipeline has been successfully executed by checking the console output for the build process.
Step 7: Expand the pipeline definition
Let’s expand the pipeline by adding two more stages to the pipeline. For that, click on the “Configure” option and change the pipeline definition according to the following code block.
pipeline {
    agent any
    stages {
        stage('Stage #1') {
            steps {
                echo 'Hello World'
                sleep 10
                echo 'This is the First Stage'
            }
        }
        stage('Stage #2') {
            steps {
                echo 'This is the Second Stage'
            }
        }
        stage('Stage #3') {
            steps {
                echo 'This is the Third Stage'
            }
        }
    }
}
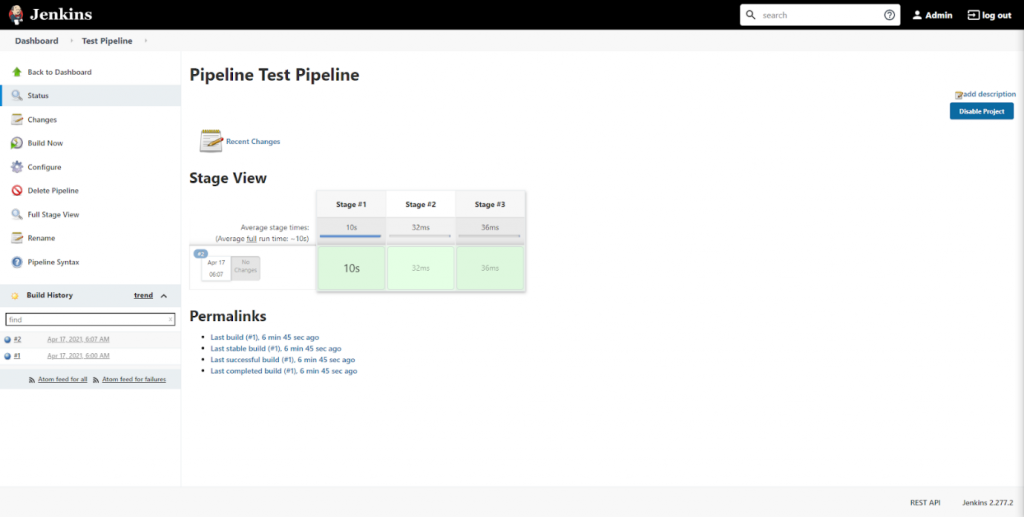
Save the changes and click on “Build Now” to execute the new pipeline. After successful execution, we can see each new stage in the Stage view.
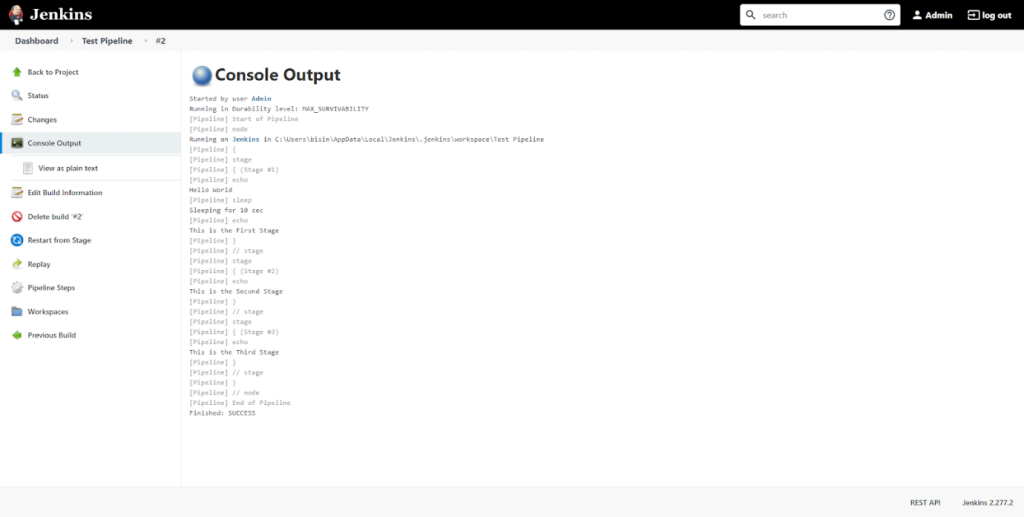
The following console logs verify that the code was executed as expected:
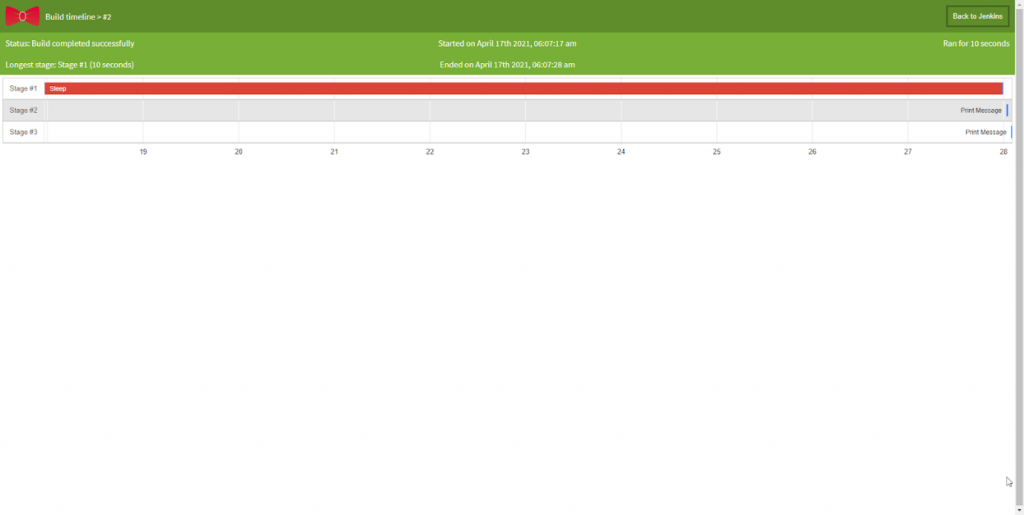
Step 8: Visualize the pipeline
We can use the “Pipeline timeline” plugin for better visualization of pipeline stages. Simply install the plugin, and inside the build stage, you will find an option called “Build timeline.”

Click on that option, and you will be presented with a timeline of the pipeline events, as shown below.
That’s it! You’ve successfully configured a CI/CD pipeline in Jenkins.
The next step after configuring your Jenkins pipeline is to orchestrate Jenkins pipelines with Control-M — adding enterprise scheduling, SLA management, and dependency coordination for the production data and application workflows that Jenkins deployments trigger.
- External code repositories
- Test frameworks
- Deployment strategies
Good luck!
Cloud-based Azure CI/CD pipeline example
With the increased adoption of cloud technologies, the growing trend is to move the DevOps tasks to the cloud. Cloud service providers like Azure and AWS provide a full suite of services to manage all the required DevOps tasks using their respective platforms.
The following is a simple cloud-based DevOps CI/CD pipeline entirely based on Azure (Azure DevOps Services) tools.

Cloud-based CI/CD pipeline using Azure
- A developer changes existing or creates new source code, then commits the changes to Azure Repos.
- These repo changes trigger the Azure Pipeline.
- With the combination of Azure Test Plans, Azure Pipelines builds and tests the new code changes. (This is the Continuous Integration process.)
- Azure Pipelines then triggers the deployment of successfully tested and built artifacts to the required environments with the necessary dependencies and environmental variables. (This is the Continuous Deployment process.)
- Artifacts are stored in the Azure Artifacts service, which acts as a universal repository.
- Azure application monitoring services provide the developers with real-time insights into the deployed application, such as health reports and usage information.
In addition to the CI/CD pipeline, Azure also enables managing the SDLC using Azure Boards as an agile planning tool. Here, you’ll have two options:
- Manually configure a complete CI/CD pipeline
- Choose a SaaS solution like Azure DevOps or DevOps Tooling by AWS
CI/CD pipelines minimize manual work
A properly configured pipeline will increase the productivity of the delivery team by reducing the manual workload and eliminating most manual errors while increasing the overall product quality. This will ultimately lead to a faster and more agile development life cycle that benefits end-users, developers, and the business as a whole.
Learn from the choices Humana made when selecting a modern mainframe development environment for editing and debugging code to improve their velocity, quality and efficiency.
Related reading
- BMC DevOps Blog
- How Containers Fit in a DevOps Delivery Pipeline
- How & Why To Become a Software Factory
- Book Review of The Phoenix Project: DevOps For Everyone
- Enterprise DevOps: Increase Agility Across the Enterprise
These postings are my own and do not necessarily represent BMC's position, strategies, or opinion.
See an error or have a suggestion? Please let us know by emailing [email protected].